Monday, August 23, 2010

Window Air Filter 08 23 2010


These Pictures in order of Assembly.

Window Air Filter 08 23 2010
Air quality is terrible, smog, mercury, smoke, exhaust gases, you name it the list of perpetrators is a long one and it is not healthy even to read these toxic names...
Stuffy nose at night, allergy problems, dirty bedroom floors, constant dusting.  I have found the answer
These are simple window filters you can make with little cost.  They can be made to any desired height.  Mine are about 8 1/2 inches high and 36 ¾ or 36 7/8  long. The window gaps were slightly different side to side when comparing one window to the other.  I am considering making a shorter height pair for my two bedroom windows for the fall and late spring weather when it is colder but not too cold to close the window completely.
Long pieces of the filter frame were made from scrap strips of two by fours that were trimmed to make them modular.  The end and middle upright pieces were made from short two by four scraps.  And the long strips were fastened to the upright frameworks with inset square screws.  Glue was added to the joints before they were closed with the screws.  The two frames took me about an hour and half to make working very fast, not including paint drying time.
The frame was then primed, painted and clear coat sealed. Or something like that, maybe they were just primed and clear coated.  Anyhow they withstand rain without any coming inside the house and the clear coat keeps them from absorbing water.

The filter material was cut from a new fine furnace filter I bought at Menards (our discounting regional hardware store) for around nine dollars.  One filter was enough to -make two of these window filters.  The product name TrueBlue Allergan Protection. The original filter size was 20 X 25 X 1 and they are rated MERV 11. They are manufactured by Protection Plus Industries, the website is http://www.trueblue.com/ and their phone number is 888-808-9100. And the filter had a metal one inch grating to help it keep rigid, that makes it more durable.  A long scissors was used to cut it from the single layer cardboard of the surface of the original filter frameworks, this is the part that is made on the filter to reinforce the filter media from its bellows or pleats and keep the pleats or bellows fixed in place.  This allows you to stretch out the filter and make it easier to work with.  I have no idea about the fire rating of these and did not consider it because they are placed inside a furnace.  But if you light candles or something these would probably burn like a curtain or shade also.
The filter was staple gunned to the wood frame I made.  For depth of two relevant issues see:
The filter sits tightly in the window and is held in place by pulling the top down to about abut against the top of the filter.  It was made to precision length so it sits snug side to side.  The face of the filter with filter media stapled to it faces outdoors.  The window screen is still in place when these are used.
 A small gasket seals the glass window to glass window gap above the filter that was created between the glass layers as the window is in a raised position.  The gasket was made from military surplus foam that was backed with foil and purchased from American Science and Surplus, a brief check tells me they sold out of this, but any 1/4" thick compressible foam that can be cut to dimensional strips of sufficient length will work This material worked very in the past to serve as a window gasket during the winter and summer months to insulate any air gaps.
  What surprised me most about using these filters was that when I cleaned and mopped my hardwood floor after three months of having these filters in it was very clear.  And upon inspection of the outside of the filter after three months they were gray with dirt.  A dirt that would have made it in the house and my lungs, and dust on all the inside that would have to be cleaned.  This need for cleaning was eliminated.
To keep cool in summer place a directional quiet fan on a shelf above your bed, mine is a Lasko model 4904, purchased at either Wal*Mart? or Menards? or online? Connect this to one of those cords with a lighted ball switch and locate this next to your head where you can turn it on if weren’t hot when you went to bed but got hot during the night.  The cord I have is a YU CHOU model YC14 and I am not sure where I bought it.  The convenience of these two parts alone might save you from heat stroke someday.  PURCHASE BALL SWITCH CORD HERE
I also have a small ultraviolet air cleaner in my room to further clean the air, Airtech Model 2000 by Exa-Med, I bought this online.  Purchase Ultraviolet Air Cleaner Here
I recommend everyone make these window air filters  or buy a commercially available model window air filter as they are available on line.
God Bless Those Who Read and Learn and Make and Do
Thomas Paul Murphy
Copyright 2010 Thomas Paul Murphy


Tuesday, August 17, 2010

Heavy Industrial Quality Hooks for Your Garage, Workshop and Home for Next to Nothing 08 09 2010


Heavy Industrial Quality Hooks for Your Garage, Workshop and Home for Next to Nothing 08 09 2010


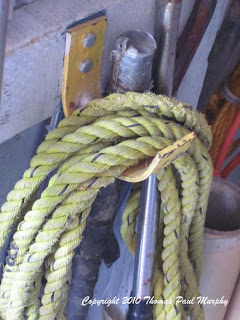
How many times have you found the utility wall mounted hooks you buy at the hardware stores inadequate? Sometimes they are mad out of white metal and at inopportune times they unsafely break off.

Here is the solution I found to make my own. I use cold rolled ¼” by 1” or 1 ¼” steel strips and bend them into strong hooks that readily hold an extension cord, rope, tools, etc..

To make them I drill a hole one inch from the end of the strip metal and another about an inch from that to serve as a fixing hole to keep the hook from turning. I use a ¼” or 5/16” diameter lag screws and choose a cobalt drill bit large enough so that the lag screw threads and non-threaded base, the thicker part before the hex head pass through easy. Length is about 1 ¼” or 1 ½”.

Follow the directions of your metal bender.

After the hooks are bent, cut the end with a reciprocating saw with a cobalt 14 tooth blade. Prime and paint and mount where they will be handy.

Be safe when using your bender, make sure that it is securely fixed in place, and wear leather gloves and a face guard when bending as these types of operations tend to jerks and snaps in arm pressure that can be dangerous, as there is a lot of force required to bend.

You will have learned a core blacksmithing skill, something that is becoming a lost art that you will enjoy. And you will have created a product unlike any other on the market shelves at your hardware store.


God Bless Those Who Think

Thomas Paul Murphy

Copyright 2010 Thomas Paul Murphy

Portable Kayak Wheels 08 09 2010


Portable Kayaking Wheels 08 09 2010


Or How I Made Detachable Wheels for My New Kayak From Stuff I Had I.e. FREE
After carrying my Kayak over a half mile including a steep ramp on a bluff, I decided there must be an easier way to carry the Kayak from car to water. On a walk one earlier afternoon to Lake Michigan I watched how three men pulled their Kayaks by the front with the rear mounted on a removable wheel base.

Now this challenged my ingenuity as I saw some listed for sale for $80 and did not want to pay that much for it, because I am an American with ingenuity.

So here is what I did, I grabbed a ½ inch in diameter long bolt about 2 feet long and determined what the wheel base would be by looking at the width of the Kayak back a foot from the nose and looking at the width of the wheels that I would use. I added an inch for the retaining nut and cut the rod, that had a bolt head on one end to length using a reciprocating saw with a Cobalt 14 tooth saw blade.

The wheels I used were dismantled off a plastic fertilizer spreader my neighbor two doors down discarded. They were light and had about the same diameter and my steel rod, maybe they were 1/16” larger in diameter.

I took a measurement of the approximate cross section width of the nose and determined the slope of the Kayak hull by folding a piece of paper to the angle of the hull and perpendicular to the surface of the “EARTH”.

I then found a remnant piece of a cedar 2”x 6” in the wood pile and subtracted my wheel width times two plus end nut from the length of the rod. I trimmed one end of the 2”x6” to have a clean and smooth cut measured and cut clean to length from that end.

Along the lower edge of the two by six I planned to drill an axle hole lengthwise for my ½” diameter axle bolt. So I made sure not to cut the wood into the area that would contain the axle hole. An axle of this type needs a bulk of material around it to be durable and safely drilled straight.

Having my measurement for the nose contour I found the center of my two by six. And drew where to cut my “Resting channel” from the other edge inward. I still had the miter saw out so I rough cut part of each of the channel sides. The remainder of the contour form, where the rounded bottom or keel would sit, I would cut out with a portable band saw and wood chisel.

On the upper channel edges I drilled angled pilot holes and mounted two eyelet screws.

On the bottom edge of the cedar support I marked where my holes were to be drilled ¾” inch in from the side and 1 inch in from the edge. I then drilled out the lengthwise hole for the axle using my drill press on each end and then shot through with a 1/2" diameter long drill bit to adjoin the holes for the straight axle shaft.

Engineers of the past used to add features that were not readily useable but where added to make repairs and upgrades easier by the consumer. This concept fell by the wayside probably at the same time as the adoption of the metric system came into being. Somewhat above the axle and centered on each side of my wood I drilled two tapered accessory holes.

I put the ½” rod in the vice and grabbed my electric pipe threader with its ¼” die for pipes and put some threads on the end of the axle bolt.

In the contour formed channel that would support the Kayak I industrial stapled a strip from the same blown out mountain bike tire that I used to cushion my bicycles handlebar grip with.

I used four large nylon washers to eliminate side friction at the wheels. The washers had to be cut to ½” diameter and I did so by using a hammer and a round cutting punch.

A bungee cord, ( I hate them) holds the contoured wheel base to the hull of the kayak by bastioning to the eyelet screws and providing dynamic pressure.

I did also end up using the accessory holes I drilled. Using ½” military surplus strap secured the wheelbase longitudely in place from the front eye of the Kayak to its accessory straps fore of the Kayak seat.

The second time I used my Kayak I was able to put forth more effort to paddling than carrying.

The light wheels rolled over sand and stone and up and down concrete walkways and ramps with ease.

The wheelbase fit inside the nose of my Kayak when I was paddling.

I made this wheelbase in less than one hour and went Kayaking the same day I talked to the three gentlemen Kayakers.

God Bless Those Who Think

Thomas Paul Murphy

Copyright 2010 Thomas Paul Murphy

Thursday, August 5, 2010

HOW TO MAKE AN AUTOMOBILE LUMBAR SUPPORT FOR FREE 08 02 2010

HOW TO MAKE AN  AUTOMOBILE LUMBAR SUPPORT FOR FREE 08 02 2010

For 20 years I got a back ache from driving long distances in a car. One day when shopping in a hardware store, I saw 4 ft. long flotation aids for pools and beaches-actually a child’s toy. They were free after a $2.OO rebate. I thought they would make a good pipe insulator or barbell shoulder pad for squatting. At the very least I saw plenty of potential for material utilization. I purchased 4 of them free after rebate. One of them I cut into a 15 inch segments and used it to hold leader hooks. After some deliberation I cut one of them into 3 segments the width of my car seat. Having 3 equal segments, I went to my roll of green cotton ½ inch wide military surplus strap.  I thread the tubes on the strap one after another like threading beads on a string, with excess strap hanging out the end. I folded them at the joint so they were parallel to one another with the cross section being a parallel pattern to one another. I fastened the military cord tightly so the center of the triad foam tubes formed an equilateral triangle. I tied it together with knots on the end and cut the military surplus strap free from its spool. I now have a lumbar support that works far better than any I have seen.  After a trial period I made a second for our other car.

God Bless Those Who Think
Thomas Paul Murphy
Copyright 2010 Thomas Paul Murphy

Wednesday, August 4, 2010

New 1400 pound capacity wheels for a man's Utility Wagon


Bought from Surplus Center online store when blew a tire on this wagon carrying 500 pounds of yellow pine bleacher seat wood.  They fit perfectly on the half inch axle.  The cross section of the wheel was within the axle stick out length so and the old push on fastening washers were reused after being carefully removed.  The description say's these wheels are virtually indestructible.  This was my boyhood wagon, a few years ago I reinforced the box and gave it a new coat of red rustoleum paint.  Back in the 80's I repainted the handle and metal work.  This wagon is still holding up well after 35 years.  Should I put a motor on it and ride it around town, steering by the pull handle?  Men do stranger things than this in this day and age don't they?

It is good to maintain things of nostalgia.

Thomas Paul Murphy
Copyright 2010 Thomas Paul Murphy

Followers

About Me

My photo
Welcome to my Blogs. My name is Thomas Murphy and I love the forest and wildlife areas of Wisconsin and would like to share my thoughts and the pictures I have taken of the natural areas of Wisconsin. Come share in my collection of what I feel to some of the finest scenes and images of the forests, lakes, rivers and marshes that Wisconsin has to offer. I like to go to pristine and secluded areas where nature resides quietly and I feel the resulting “lost” images are profoundly unique. I am usually “in the moment” when I take these pictures. When I say in the moment I mean a sense of excitement often precedes what my eye captures through the camera. I never stage these shots but seem to be in the right place and time when I shoot them. And when I transfer them from my camera and view them on my computer screen I realize a sense of surrealism that resonates with me yet again to the time they were taken and exemplify the beauty of nature. Please peruse my sites and experience the beauty of being there as I did. WWW.ThomasMurphy.lifepics.com